Managing property expenses effectively is crucial for property management success. This complete guide will walk you through the process of tracking property expenses using AppFolio’s Enter Bill workflow. Whether you’re dealing with a single property or multiple properties, this guide covers it all.
With AppFolio’s Enter Bill workflow, you can easily record expenses for one or more properties. Plus, you have the flexibility to pay bills using various methods such as checks, eChecks, ACH payments, and more.
Inside this blog post, You’ll Find:
- Enter a Bill for One or More Properties: Learn how to record expenses efficiently.
- Allocate a Bill Across Multiple Properties: Manage expenses for multiple properties effortlessly.
- Repeat an Existing Bill: Simplify the process of recurring expenses.
- Enter a Bill for One or More Properties
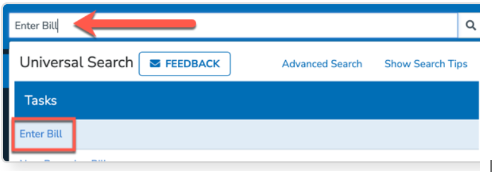
- Type Enter Bill into the search bar and select the matching result from the Tasks subsection of the results list.
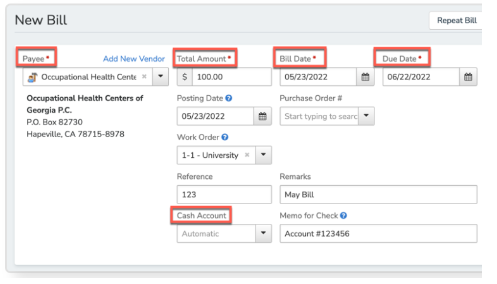
2. On the New Bill page, enter the following details for your bill:
3.
- Payee – Enter the name of the vendor the bill is being paid to. If the vendor isn’t in your system yet, you can click the blue Add New Vendor link to enter their information instead.
- Total Amount – Enter the total amount the vendor is owed for the related work. You can break this amount up into distinct charges later on when creating your bill line items.
- Bill Date and Due Date – Enter the date on which the bill was created. The Due Date will match the Bill Date by default.
- Posting Date (Accrual Accounting Only) – The date the charge will appear on financial reports (such as the General Ledger) when run on an accrual basis.
- Purchase Order # – Enter an optional purchase order number to associate that Purchase Order with your bill.
- Work Order – Enter an optional Work Order Number to associate with that Work Order with your bill.
Note
- Associating a Work Order with a bill will automatically close the Work Order once the bill has been processed.
- Reference (optional) – Enter any invoice or bill numbers (if applicable).
- Remarks (optional) – Add notes you would like to include regarding the bill.
- Cash Account – Select the cash account linked to the bank account you would like to pay the bill from. This field will default to Automatic and utilize the property’s default cash account unless edited.
- Memo for Check (optional) – Enter a memo that will appear on the check or other payment when the bill is paid.
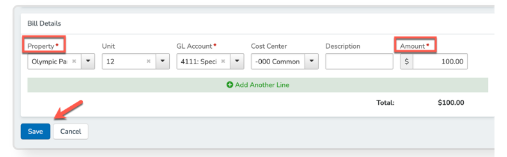
- Next, scroll down and locate the Bill Details section of the page. Enter the following details for this bill.
2.
- Property – Select the property associated with the bill.
- Unit – Enter the unit name or number (if applicable).
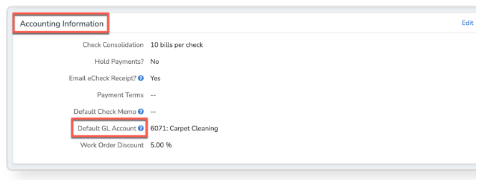
- GL Account – Select your desired GL account to categorize the expense. By default, the GL account is your Key Operating Cash GL account. If your vendor has a default GL account selected on their contact page in AppFolio, this will automatically fill in.
- Description – Enter a description of the bill payment. Any description entered here will also appear on an Owner’s Statement.
- Amount – Enter the amount of the bill line item. All bill line item amounts should add up to the Total Amount defined earlier in the bill entry process
3. Finally, click the white Save button to post the bill, or click the blue button, Save & Add Another, to enter another bill. Saving a bill will create an unpaid bill in your system, which can then be paid using a check, eCheck, ACH payment, or other payment.
Allocate a Bill Across Multiple Properties
Automatically allocate an expense to be split between up to 400 properties in the same property group, portfolio, or with the same owner using the following steps:
Note
When allocating a bill across multiple properties with different bank accounts, the option to pay the bill via an Other Payment will be disabled.
- Type Enter Bill in the search bar and select the matching result from the Tasks subsection of the results list.
2. On the New Bill page, enter the following details:
4.
- Payee – Enter the name of the vendor the bill is being paid to. If the vendor isn’t in your system yet, you can click the blue Add New Vendor link to enter their information instead.
- Total Amount – Enter the total amount the vendor is owed for the related work. You can break this amount up into distinct charges later on when creating your bill line items.
- Bill Date and Due date – Enter the date on which the bill was created. The Due Date will match the Bill Date by default.
- Posting Date (Accrual Accounting Only) – The date the charge will appear on financial reports (such as the General Ledger) when run on an accrual basis.
- Purchase Order # – Enter and select a specific Purchase Order Number to associate that Purchase Order with your bill.
- Work Order – Enter and select a specific Work Order Number to associate that Work Order with your bill.
Note
- Associating a Work Order with a bill will automatically close the Work Order once the bill has been processed.
- Reference – Enter any invoice or bill numbers (if applicable).
- Remarks – Add any optional notes you would like to include regarding the bill.
- Cash Account – Select the cash account linked to the bank account you would like to pay the bill from. This field will default to Automatic and utilize the property’s default cash account unless edited.
- Memo for Check – Enter an optional memo that will appear on the check or other payment when the bill is payed.
- Scroll down the page a bit and check off the Allocation box. More fields will appear for you to fill out. Enter the following information:
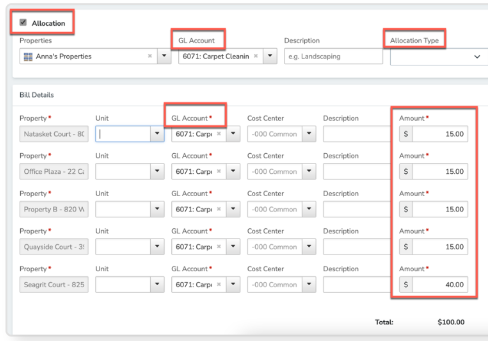
2.
- A property group, owner, or portfolio
- A GL Account
- A Description of the bill
- An Allocation Type. Available Allocation types include:
- Unit Count
- Square Footage
- Rental Income
- Even Spread
3. If the vendor has a default GL account set on their contact page, that GL account will automatically be filled in for all line items listed as part of the bill.
4.
5. Click the white Save button to post the bill, or click the blue button, Save & Add Another, to enter another bill. Saving a bill will create an unpaid bill in your system, which can then be paid using a check, eCheck, or ACH payment. You cannot pay the bill with an Other Payment if the properties are linked to different bank accounts.
6. If the properties listed are linked to different bank accounts, one payment will be created for each distinct bank account when this bill is paid.
Repeat an Existing Bill
Quickly enter a bill with all, or most, of the same details as an existing bill in your system by using the Repeat Bill task.
- Click the Accounting tab and select Payables. Then locate the desired bill and click on it.

2.
3. While on this Bill page, select Enter Bill in blue text from the Tasks menu on the right.
Click the Repeat Bill button. All the details from the previously saved or viewed bill will autofill the fields on the new bill form.

Whenever in doubt, you can reach out to an AppFolio accounting expert to help you set the foundations for clean and accurate bookkeeping. If you have questions about this topic, do not hesitate to Contact Us.
")